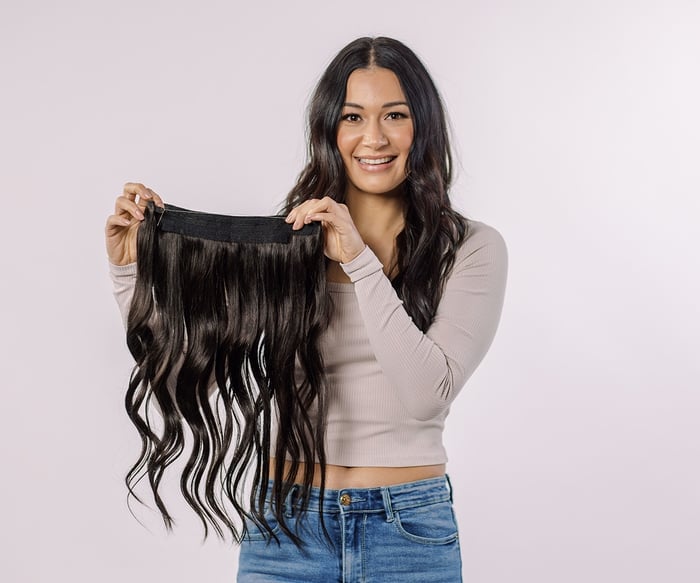
How to Use Solo/Halo® Hair Extensions
Halo® hair extensions are easy to love. Here at Donna Bella Hair®, you may have heard us call them “Solos.” These DIY hair extensions sit on your head (like a headband or halo) and you can use them to create a whole new look with just one large weft. They are the quickest method to install and you can use them to create a total hair transformation in just minutes.
What’s a Solo/Halo®?
Solo/Halo® extensions are made from one large weft of hair held together by a nylon wire. Donna Bella Hair® Solos/Halos® are made with 100% human hair and come in 3 lengths: 16", 18" and 20". They also come in two different densities: Deluxe (145-165 grams of hair) and Regular (105 grams of hair) so you can easily blend to your natural hair thickness.
Curious how to put in a Solo/Halo®? Here, we’ll guide you through a simple tutorial on how it works and then answer some commonly asked questions.
Benefits of Solo/Halo® Hair Extensions
There are many reasons to love these DIY extensions.
- They don’t cause damage to your natural hair. With no attachment points, glue, heat, or chemicals, the Solo/Halo® is the most gentle option for extensions and works great for thinning or damaged hair.
- They’re easy and fast to apply, reposition and remove.
- They work great for those with sensitive scalps.
- They boost volume and add length, giving you an instant boost of confidence, plus the freedom to style your hair in a variety of different ways.
- They blend seamlessly with your natural hair. In the same way that your natural hair is not precisely all one length, Donna Bella Hair® Solo/Halo® extensions are not all one length and come pre-blended at the ends– they are ready for blending as is, saving you time as you put on the halo.
- They sit comfortably and securely and can be worn all day.
- You can easily remove them at the end of your day or when doing activities like swimming, spending time in the sun, or doing a sweaty workout.
- Solos/Halos® are a long-lasting extension option. You can wear them daily, weekly, or once in a while for special occasions. With a simple maintenance routine for your hair extensions, you’ll keep your Solo looking beautiful for over a year!
How to Install a Solo/Halo®
Can you really transform your hair in just a few minutes? Yes! This simple, straightforward DIY method is great for low-maintenance installs that have high-impact results. Think of your Solo/Halo® like a headband that sits on top of your head.

Step 1: Part your hair.
Section your hair into a T-parting about 1-2” away from your hairline. Use a hair clip to hold your hair out of the way. The cleaner the part line you create, the easier it will be to put the Solo/Halo® on.
Step 2: Place the Solo/Halo® on your head.
Place the wire for the Solo/Halo® where you’ve created the part line, so that the extensions are resting comfortably around the crown of your head with the wire near the occipital bone.
Step 3: Let your natural hair down.
Unclip the hair and let it fall down naturally.
Step 4: Brush and style.
Use a tail comb to help pull your natural hair over the wire. Brush or comb the sides and back of your hair. Style and you’re ready to go!
Step 5: To remove, just lift the Halo® up and out.
Removing your Solo/Halo® is easy. Just grab the sides of the wire and slide the extensions up and out of your natural hair. When not in use, store your extensions in a storage bag or on a hanger.
Tips & Tricks for Using Solo/Halo® Hair Extensions
Here are a few tips from our team of expert hair stylists on how to use your Donna Bella Hair® Solo/Halo® extensions.
- The first time you install your Solo/Halo®, adjust the wire so it’s sized to your head. This helps give a comfortable, secure fit whenever you wear your extensions.
- Get the perfect color match. Match your Solo/Halo® to the most prominent color of your hair. For more help color matching, consider ordering a swatch kit or contacting us for personalized assistance.
- To save time before you get ready, curl your extensions ahead of time. Pop them on and you’re ready to go!
- If you want added volume on the sides/front of your head, or you want to add some face-framing highlights, you might consider adding a few Clip-Ins to go with your Solo/Halo®.
- Keep an extensions brush in your purse. Brush & detangle often!
Caring for Your Solo/Halo® Hair Extensions
Proper maintenance and care for your hair extensions will help keep them looking beautiful for longer.
- Brush gently and brush often. Only use an extensions brush.
- Less is more when it comes to washing your Solo/Halo®. We recommend only shampooing every 2-3 months. If you wear your extensions frequently, you may want to wash every month. Also if you have product buildup or your hair is very oily naturally, you may want to wash more often. Use only sulfate-free products.
- Brush before washing. Rinse in cold water before shampooing. Be sure to rinse shampoo out of the extensions completely, for up to 2 minutes. A hair conditioner mask or deep conditioning treatment helps lock in moisture.
- Be sure to use heat protectant before curling. When possible, air dry your extensions. If you do use a hair dryer, use it on a low or medium temperature setting.
Always store your extensions in a storage bag or on a hanger when not in use.


